How to bootstrap a NestJS project using Clean Architecture
Introduction
Starting off on the wrong foot for a project can be very incapacitating and at the same time, there is no direct value for the client. In this article you will learn how to put yourself (and your team) on the right track in order to start a project serenely. Indeed, the goal here is to set a solid and modular code base architecture allowing you to produce quality code in order to enhance the productivity or your team.
👉 Remember, quality implies efficiency !
With this in mind, we will go through two major concepts :
- Clean architecture
- Dependency injection
Initialize the project
The first things we need to do is to create our project, thus, with npm installed you can create you new NestJS project with the following
commands :
npm i -g @nestjs/cli
nest new project-name
After that, NestJS will generate your project that will contain dist, node_modules and several other classic files of a project. Initially, your src
folder will look like this:
src
├── app.controller.spec.ts
├── app.controller.ts
├── app.module.ts
├── app.service.ts
└── main.ts
Clean architecture
Structure
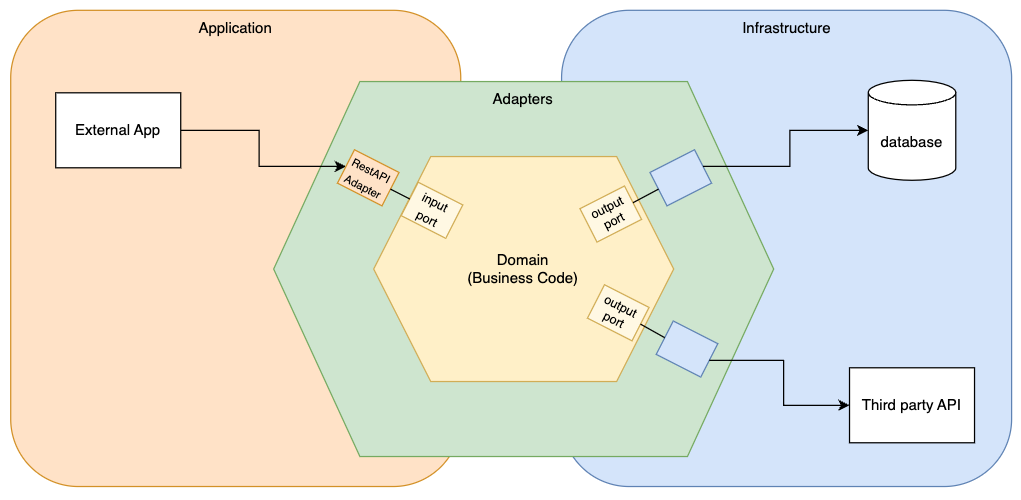
In order to build a project that will fit clean architecture principles, in most cases, hexagonal architecture with Domain-Driven-Development ( DDD) is welcome. Indeed, it allows us to isolate our business code making it independent from the different technical implementations (databases, external APIs, etc…) that may need to change.
Therefore, at the end, we want our structure to look as the following diagram:
Our src folder will then, look like this (we moved the .spec.* file into the /test folder as we prefer to have all our tests in it):
src
├── application
│   └── rest-api-adapter
│       ├── controller
│           └── app.controller.ts
├── bootstrap
│   └── app.module.ts
├── domain
│   └── app.service.ts
├── infrastructure
│   └── postgres-adapter
│       ├── adapter
│           └── postgres.adapter.ts
└── main.ts
Example of a feature
We now have the basic structure of our project but let’s say we want to add a feature that allows us to retrieve a user based on its id thanks to
a Rest API from a postgresSQL database. How should this look like ?
Designing our feature
We talked earlier about technical implementations on which our business logic (domain) should not be dependent of. In our case, our technical implementations are :
- The Rest API
- The postgreSQL database
This is the reason why we will move those elements inside packages that are called adapters and we will connect them to our domain through interfaces named ports.
The architecture of ou project will then look like this:
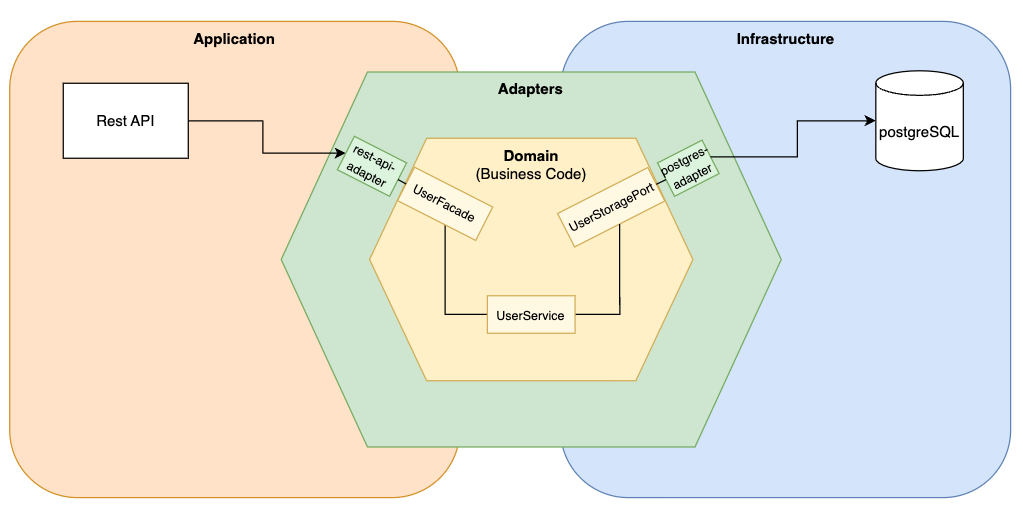
That way, if at some point in the life of the project, we would come up with the idea to change the database, we would just have to create a new adapter with a new port and connect everything to our domain without having to change our business code (domain).
Now, the structure of our code looks like this (with a bit of renaming to fit our use case):
src
├── application
│   └── rest-api-adapter
│       ├── controller
│       │   └── user.controller.ts
│       └── dto
│           ├── get-user.dto.ts
│           └── user.dto.ts
├── bootstrap
│   ├── app.module.ts
│   ├── rest-api-adapter.module.ts
│   ├── domain.module.ts
│   └── postgres-adapter.module.ts
├── domain
│   ├── model
│   │   └── user.model.ts
│   ├── port
│   │   ├── in
│   │   │   └── user.facade.ts
│   │   └── out
│   │       └── user.storage.port.ts
│   └── service
│       └── user.service.ts
├── infrastructure
│   └── postgres-adapter
│       ├── adapter
│       │   └── postgres.user.adapter.ts
│       ├── entity
│       │   └── user.entity.ts
│       └── ormconfig.ts
└── main.ts
We still have our 4 main directories (application, domain, infrastructure and boostrap). We see our rest-api-adapter which will contain our
controllers and DTOs, our domain containing our models, our ports (in order to discuss with technical dependencies) and our services where we can put
our business logic inside. We also notice our postgres-adapter . For the purpose of this example, we used TypeORM to manage
our database.
Controllers
For our case, the user.controller.ts looks as follows:
import {Controller, Get, Inject, Param} from '@nestjs/common';
import {GetUserDTO} from '../dto/get-user.dto';
import {UserFacade} from '../../../domain/port/in/user.facade';

@Controller('/users')
export class UserController {
    constructor(
        @Inject('UserFacade')
        private readonly userFacade: UserFacade,
    ) {
    }

    @Get(':userId')
    async getUser(@Param('userId') userId: string): Promise<GetUserDTO> {
        const user = await this.userFacade.getUserById(userId);
        return GetUserDTO.fromDomain(user);
    }
}
We pass the interface UserFacade inside the container of our controller as a dependency.
Services
The user.service.ts looks like this:
import {UserFacade} from '../port/in/user.facade';
import {User} from '../model/user.model';
import {UserStoragePort} from '../port/out/user.storage.port';

export class UserService implements UserFacade {
    constructor(private userStoragePort: UserStoragePort) {
    }

    async getUserById(userId: string): Promise<User> {
        const user = await this.userStoragePort.getUserById(userId);
        /*
        Manipulating the object (Business Logic)
         */
        return user;
    }
}
By passing to our service a simple interface (UserStoragePort), we make it independent. The service, which is part of our domain, just retrieves an
object from an implementation without knowing which one (in that case, our postgres-adapter ). Then we can manipulate this object and return it to
our rest-api-adapter.
👉 We clearly see that if we decide to change our database or our API for anything else, it will not affect our business code at any time.
Creating our local database
For this example, we will create our database using docker-compose .
At the root of your folder, you will add a docker-compose.yml file with the following content:
version: '3.2'

services:
  database:
    platform: linux/amd64
    image: "postgres:13"
    container_name: "example-container"
    environment:
      - POSTGRES_USER=postgres
      - POSTGRES_PASSWORD=P@ssw0rd
      - POSTGRES_DB=example-database
    ports:
      - "5432:5432"
You then can launch your local database with the following command:
docker-compose up
Dependency injection
If we try to launch our application in its current state, it won’t work. Indeed we still have to write our dependency injections. That is the purpose
of the bootstrap folder. NestJS works with modules. We will have an AppModule (which should have been generated
at initialization). This is the first module that will be imported at runtime by our main.ts file.
👉 Important : The concept of clean architecture involves a very powerful notion which is dependency inversion that makes our domain only dependent on abstractions (interfaces). Consequently, this increase the modularity of our code and makes it way more testable.
Back to our project, if we take the example of our domain.module.ts to see how we make our dependency injections, we see this:
import {Module} from '@nestjs/common';
import {PostgresAdapterModule} from './postgres-adapter.module';
import {UserStoragePort} from '../domain/port/out/user.storage.port';
import {UserService} from '../domain/service/user.service';

const UserFacadeProvider = {
    provide: 'UserFacade',
    useFactory: (userStoragePort: UserStoragePort) =>
        new UserService(userStoragePort),
    inject: ['PostgresUserAdapter'],
};

@Module({
    imports: [PostgresAdapterModule],
    providers: [UserFacadeProvider],
    exports: [UserFacadeProvider],
})
export class DomainModule {
}
We import inside the DomainModule the PostgresAdapterModule in order to provide the implementation to our UserStoragePort that is used inside
our service (i.e the PostgresUserAdapter here).
We then export the entire DomainModule in order to be able to use it inside our RestApiAdapterModule as follows:
import {Module} from '@nestjs/common';
import {DomainModule} from './domain.module';
import {UserController} from '../application/rest-api-adapter/controller/user.controller';

@Module({
    imports: [DomainModule],
    controllers: [UserController],
})
export class RestApiAdapterModule {
}
As it is the module of our Rest API, this is where we import our controllers.
For the postgres-adapter module to work properly, it remains to configure TypeORM but I leave it to you to do so by using the official documentation of NestJS.
Conclusion
If you followed the steps of this article and been able to start your application properly, you should now have a project with a clean architecture that will allow you to build modular applications. Besides, your business code won’t be dependent on your choices of implementation allowing you to make mistakes (yes it happens).